
Embarking on a residential renovation is a significant investment of time, money, and trust. While envisioning the final result is exciting, the path to that outcome is paved with countless details where quality can either shine or falter. A generic approach simply won't suffice. To ensure your project not only meets but exceeds expectations, a systematic, stage-by-stage construction quality control checklist is not just helpful; it is your project's single most important insurance policy against costly mistakes and disappointing outcomes.
This comprehensive guide moves beyond vague advice, breaking down the 10 critical quality checkpoints every homeowner and contractor must master for successful residential remodeling and repair projects. We will cover everything from the initial pre-construction site assessment to the meticulous final walkthrough and punch list documentation. Forget guesswork; this article provides actionable steps, measurable standards, and specific defects to watch for at each phase.
You will learn precisely what to inspect during framing, how to verify MEP rough-ins are correct before the walls are closed, and the tolerances for a flawless tile installation. For homeowners, this checklist is a powerful tool for informed oversight, clear communication, and ultimate peace of mind. For contractors, it serves as an indispensable framework for delivering the consistent, high-quality results that build lasting reputations and secure client satisfaction. This isn't just a list; it's a roadmap to building it right the first time. Let's dive into the checkpoints that transform a good renovation into a great one.
1. Pre-Construction Site Assessment and Documentation
A pre-construction site assessment is the foundational step in any successful residential renovation or repair project. It involves a meticulous inspection and documentation of the project area's existing conditions before any work commences. This process creates a crucial baseline record, serving as a single source of truth for the property's state at the project's start. It is an indispensable part of a comprehensive construction quality control checklist, safeguarding both the homeowner and the contractor.
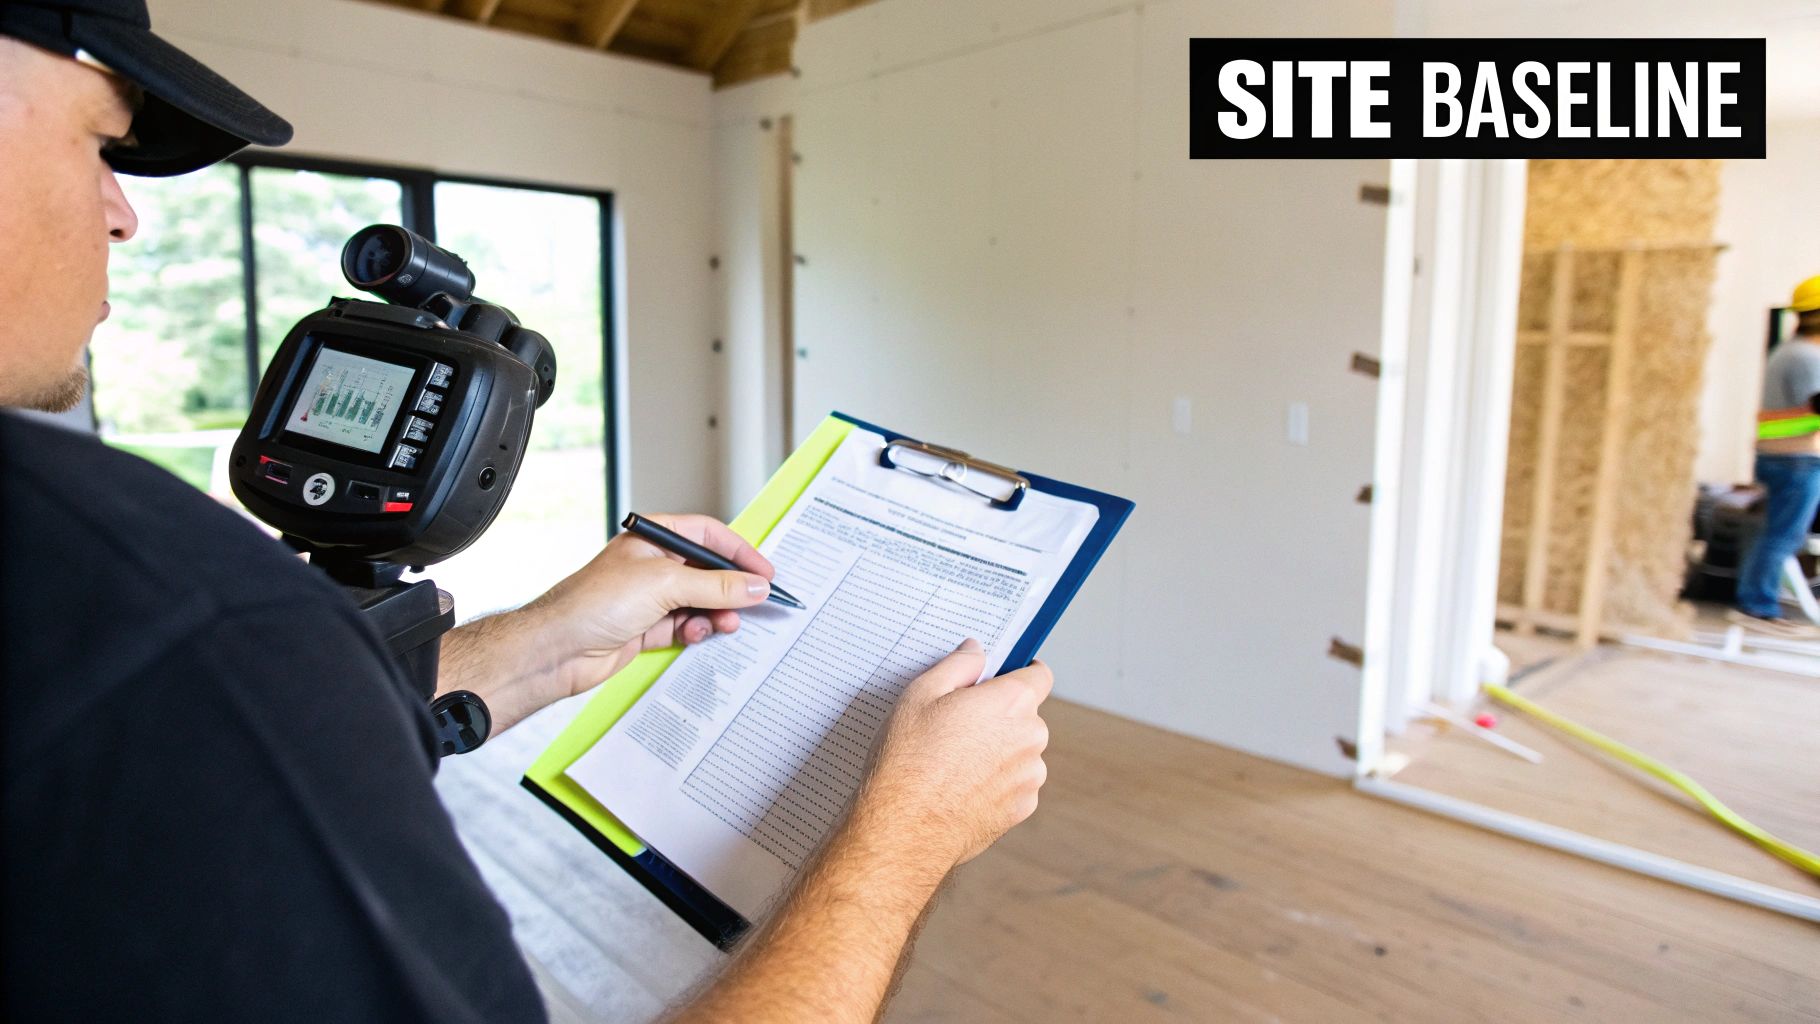
This step prevents future disputes over pre-existing damage, helps uncover unforeseen issues that could impact the budget and timeline, and ensures the initial scope of work is accurate. It's a non-negotiable part of due diligence.
Why This Step Is Critical
Without a documented baseline, it becomes impossible to fairly determine responsibility for issues that may arise during the project. A small, unnoticed crack in a tile or a pre-existing scuff on a wall can become a point of contention later. This initial assessment protects everyone's interests.
- Example 1 (Kitchen Remodel): Before demolition, a contractor photographs the existing kitchen, noting a slight discoloration on the drywall under the sink. This documentation proves the water damage was pre-existing when it's fully revealed after cabinet removal, allowing for a transparent change order discussion rather than an argument over liability.
- Example 2 (Flooring Installation): A team documents uneven spots and minor cracks in the subfloor before installing new hardwood. This record justifies the need for subfloor leveling, an extra but necessary step for a quality installation.
Actionable Implementation Tips
To execute this step effectively, focus on systematic documentation and clear communication. The goal is to leave no ambiguity about the site's initial condition.
- Use a Standardized Template: Create a simple checklist for each room or area, noting walls, floors, ceilings, windows, and fixtures.
- Comprehensive Photography: Take wide-angle shots of each room, followed by detailed close-ups of any imperfections, such as scuffs, cracks, or stains.
- Video Walkthroughs: For larger projects like whole-house renovations, a narrated video walkthrough provides invaluable context.
- Secure Sign-Off: The homeowner and contractor should review and sign off on the baseline condition report. This formalizes the agreement and is a key milestone before work begins. Establishing this level of clear communication early is vital, and you can prepare by knowing the right questions to ask your general contractor from the very start.
- Cloud-Based Storage: Store all photos, videos, and signed documents in a shared, cloud-based folder for easy access by all parties.
2. Material Inspection and Verification at Delivery
A crucial checkpoint in any residential project is the meticulous inspection and verification of all materials the moment they are delivered to the site. This process involves confirming that every item, from lumber and tile to fixtures and paint, matches the project's specifications, is free from damage, and meets the required quality standards before it is accepted and stored. This step acts as the gateway for quality, ensuring only approved materials enter the workflow. It's a fundamental part of any effective construction quality control checklist, preventing costly delays and subpar results down the line.
Accepting incorrect or damaged materials can derail a project's timeline and budget. Verifying everything upon arrival ensures that any issues are identified and resolved with the supplier immediately, rather than discovered mid-installation when the impact is far greater.
Why This Step Is Critical
Without a formal inspection at delivery, you risk incorporating defective or incorrect materials into the build, which can compromise both the final aesthetic and the long-term durability of the work. A slight variation in a paint batch or a cracked box of tiles can become a major headache if not caught early. This verification step protects the project's integrity and the homeowner's investment.
- Example 1 (Kitchen Cabinet Delivery): Upon delivery, the contractor inspects the custom kitchen cabinets. They verify that the finish matches the approved sample, the hardware is correct, and there are no scratches from shipping. One cabinet door has a deep gouge, which is noted and rejected on the spot, triggering a quick replacement order before the installation schedule is affected.
- Example 2 (Flooring Delivery): Before accepting a pallet of engineered hardwood, the installer checks the product codes and batch numbers to ensure color consistency. They also use a moisture meter on several planks to confirm they meet the manufacturer's specifications for the local climate, preventing future warping.
Actionable Implementation Tips
To make material verification a seamless part of your process, focus on preparation and clear protocols. The goal is to create an efficient system for checking every delivery against project requirements.
- Create Material-Specific Checklists: Have checklists ready for each major delivery (e.g., flooring, plumbing fixtures, paint), detailing product codes, quantities, and specific quality points to inspect.
- Photograph Everything on Arrival: Document the condition of materials as they are unloaded, taking close-up photos of labels, product codes, and any visible damage.
- Establish a Supplier Protocol: Clearly communicate your inspection process with suppliers beforehand. Define the procedure for rejecting damaged goods or incorrect items to ensure swift returns and replacements.
- Verify Certifications: If the project requires specific standards (e.g., low-VOC paint, FloorScore certified flooring), have the certification documents on hand and confirm the delivered products comply.
- Proper Storage Post-Inspection: Immediately move verified materials to a designated, protected storage area to prevent damage or loss on-site.
3. Framing and Structural Inspection
A framing and structural inspection is the critical checkpoint that validates the "bones" of your renovation project. This step involves a rigorous evaluation of all new or modified framing, load-bearing walls, and support components to ensure they meet engineering specifications and local building codes. It happens after the demolition and framing are complete but before any insulation, plumbing, electrical, or drywall is installed, making it an essential part of any construction quality control checklist.
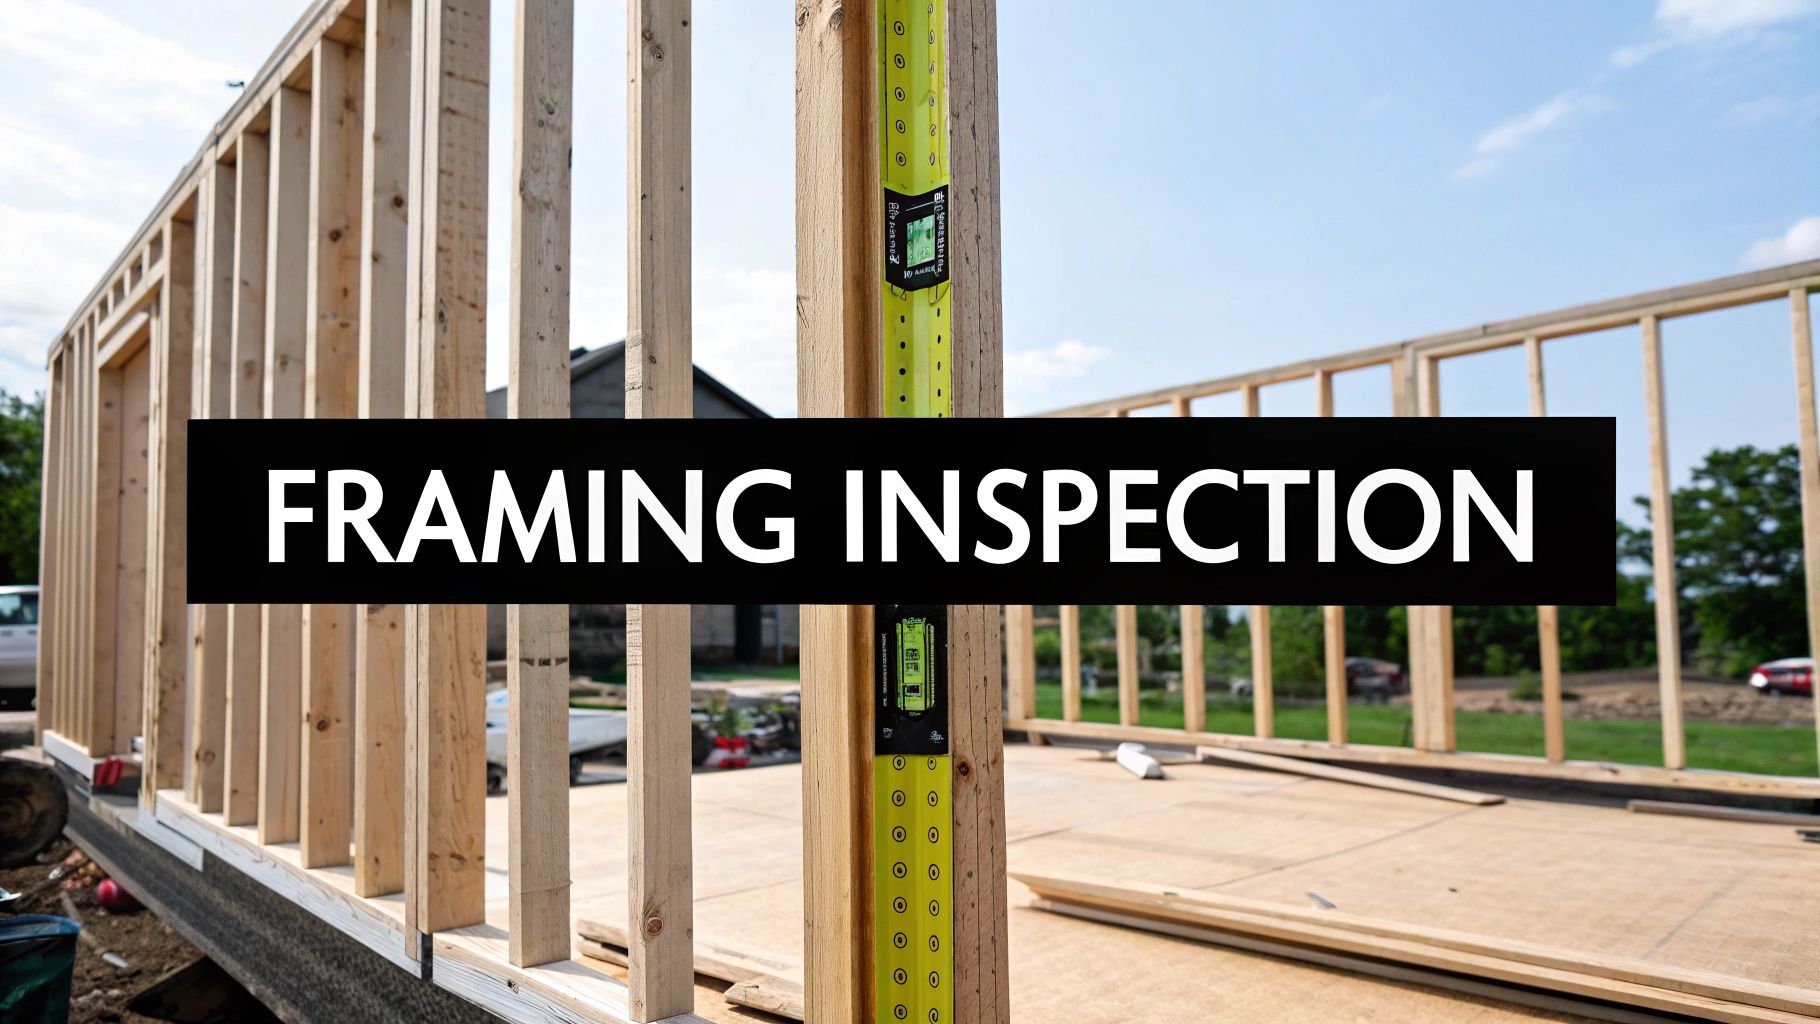
This inspection guarantees the structural integrity and long-term safety of the finished space. It confirms that everything from stud spacing and header sizes to connection methods is correct, preventing future issues like sagging floors, cracked drywall, or even catastrophic failure.
Why This Step Is Critical
Once framing is covered with drywall and finishes, correcting structural mistakes becomes exponentially more expensive and disruptive. A thorough inspection at this stage is a non-negotiable step to verify that the project is built on a solid, safe, and code-compliant foundation. It is the only opportunity to see and verify the core structure.
- Example 1 (Kitchen Renovation): A homeowner wants to remove a wall for an open-concept kitchen. The inspection verifies the new support beam is correctly sized, installed, and secured to the proper load points, ensuring it can safely carry the weight previously held by the wall.
- Example 2 (Bathroom Expansion): During an expansion, new walls are framed to support heavy tile and a large tub. The framing inspection checks for proper stud spacing and blocking to handle the significant load, preventing future wall flex and tile cracking.
Actionable Implementation Tips
A successful framing inspection relies on precision, adherence to plans, and alignment with official building codes. Systematic verification is key.
- Use a Specific Checklist: Create a framing checklist tailored to your project, noting stud spacing (e.g., 16 inches on-center), header sizes over windows/doors, and proper use of jack and king studs.
- Verify with Precision Tools: Use laser levels to check for plumb (vertical) walls and level (horizontal) floors and ceilings. A tape measure is essential for confirming all dimensions against the architectural plans.
- Coordinate with Official Inspections: Schedule your internal quality control check just before the official municipal building inspector is due. This allows you to identify and fix any issues beforehand, ensuring a passed inspection.
- Document Everything: Take detailed photos of all structural connections, headers, and bracing before they are concealed. These photos serve as a permanent record of proper installation.
- Review All Connections: Meticulously check that all joist hangers, straps, and fasteners are installed correctly according to the manufacturer’s specifications and engineering plans.
4. Mechanical, Electrical, and Plumbing (MEP) Systems Inspection
The Mechanical, Electrical, and Plumbing (MEP) systems are the functional lifelines of any home. An MEP inspection is a critical quality control step performed after the "rough-in" stage but before insulation and drywall are installed. This checkpoint verifies that all wiring, piping, and ductwork are correctly and safely placed, ensuring they comply with building codes and the project's design specifications. It is an essential part of any construction quality control checklist, especially for kitchen and bathroom remodels.
This inspection is the last chance to easily identify and correct issues with these hidden systems. Finding a problem after the walls are closed is exponentially more difficult and expensive to fix, involving demolition and rework. Getting the MEP rough-in right is fundamental to the home's long-term safety and functionality.
Why This Step Is Critical
Properly installed MEP systems are non-negotiable for safety and performance. Faulty wiring can lead to fire hazards, incorrectly sloped plumbing can cause chronic drainage issues, and poorly designed HVAC ductwork results in inefficient heating and cooling. This inspection confirms that licensed professionals have installed everything to code, preventing future system failures and ensuring the safety of the home's occupants.
- Example 1 (Kitchen Remodel): During a kitchen island installation, the electrician runs wiring for new outlets. The MEP inspection verifies the circuit has the capacity for the planned appliances and that the GFCI protection is correctly installed, preventing potential electrical hazards.
- Example 2 (Bathroom Renovation): A plumber installs new water lines for a shower. The inspection includes a pressure test, which reveals a tiny, slow leak at a fitting. Fixing this now prevents catastrophic water damage that would have occurred behind the new tile wall.
Actionable Implementation Tips
A successful MEP inspection relies on meticulous verification and coordination. The goal is to confirm that every pipe, wire, and duct is perfectly installed before being concealed.
- Schedule Smartly: Plan for the MEP inspection to occur immediately after the rough-in work is complete and before any insulation is placed in the wall cavities.
- Verify Licensing: Ensure that all plumbing and electrical work is performed by licensed and insured professionals who understand current code requirements.
- Pressure Test Plumbing: Insist on a water pressure test for all new supply lines (e.g., 80 PSI for 15 minutes) and a leak test for drain lines to confirm the integrity of every connection.
- Document Everything: Take extensive photos and videos of all in-wall MEP systems. This documentation is invaluable for future reference or troubleshooting.
- Coordinate with Officials: Align your internal quality check with the official inspection timeline required by your local building department to avoid project delays.
5. Drywall Installation and Finishing Quality Inspection
The quality of drywall installation and finishing directly dictates the final aesthetic of any interior space. This multi-stage inspection process ensures that walls and ceilings are perfectly smooth, seamless, and ready for paint. It involves a meticulous review of everything from the initial hanging of the boards to the final sanding of the joint compound. This checkpoint is a critical part of any construction quality control checklist because even the highest-quality paint cannot hide poor drywall work.
A thorough inspection at this stage prevents visible seams, nail pops, and uneven surfaces that detract from the finished project. It ensures a professional, high-end result and avoids costly rework after painting has already begun.
Why This Step Is Critical
Drywall finishing is an art form, and its quality is immediately apparent in the final product. Imperfections like visible tape lines, sanding marks, or uneven joints become glaringly obvious under a coat of paint, especially in rooms with significant natural or artificial light. A proper quality check ensures a flawless canvas for the final finishes.
- Example 1 (Kitchen Remodel): After installing a new window, the drywall around the opening must be seamlessly blended with the existing wall. An inspection confirms the corner beads are straight and the joints are feathered perfectly, so there is no visible sign of the alteration once painted.
- Example 2 (Bathroom Renovation): A quality check ensures that moisture-resistant drywall seams are properly taped and sealed, which is crucial for preventing water intrusion. This is especially important in areas with high humidity, where even minor gaps can lead to problems like those found in water-damaged drywall.
- Example 3 (Living Room Accent Wall): Before applying a dark, satin-finish paint to an accent wall, a detailed inspection under bright light reveals any minor surface flaws. This allows for touch-ups, ensuring the final paint job has a uniform, luxurious sheen.
Actionable Implementation Tips
To guarantee a professional-grade finish, the inspection must be systematic and detailed, occurring after the final sanding but before primer is applied.
- Use Raking Light: Shine a bright, portable work light at a sharp angle across the wall surface. This technique, known as "raking," exaggerates shadows and instantly reveals bumps, depressions, and sanding scratches that are invisible in direct light.
- Check for Flatness: Place a long straightedge or a drywall T-square against walls and ceilings, especially across seams. There should be no significant gaps or rocking, indicating a flat, even plane.
- Perform a Tactile Inspection: Run your hand lightly over the finished surfaces, especially over joints and fastener spots. Your sense of touch can often detect subtle imperfections that the eye might miss.
- Standardize Finishing Levels: Establish a clear drywall finishing standard (e.g., a Level 4 or Level 5 finish) for the project, so the crew and homeowner have a shared expectation of the final quality.
- Inspect All Details: Pay close attention to inside and outside corners, joints where walls meet ceilings, and areas around outlets and switches. Ensure corner beads are straight and compound is feathered smoothly.
6. Paint and Siding Inspection (Interior Finish & Exterior Curb Appeal)
The quality of interior paint and exterior siding serves as a highly visible benchmark for the entire project's craftsmanship. This inspection phase is a meticulous review of all finishes, ensuring they are not only aesthetically pleasing but also functional and durable. It covers everything from surface preparation to the final coat of paint and the precise installation of siding, verifying that these protective layers are applied correctly. This step is a vital component of any construction quality control checklist because it directly impacts both curb appeal and the home’s defense against the elements.
This inspection confirms that materials meet project specifications and are applied under the right conditions to maximize longevity. It prevents premature failures like peeling paint or water intrusion, which often stem from poor preparation or application, ultimately safeguarding the homeowner's investment.
Why This Step Is Critical
Paint and siding are the first things you see, and their finish quality reflects on the entire renovation. Beyond aesthetics, they are the primary barrier protecting the structure from moisture, UV rays, and physical damage. A failure in this final layer can lead to costly underlying issues like rot or mold.
- Example 1 (Kitchen Remodel): During a cabinet refinishing project, the inspector checks for a smooth, even finish free of drips, brush marks, or overspray. They verify the color and sheen match the approved sample, ensuring the final look is cohesive and professional.
- Example 2 (Exterior Siding Replacement): An inspector confirms that each siding panel is properly aligned, securely fastened without being over-driven, and that all flashing and weather-resistant barriers are correctly installed around windows and doors to prevent water intrusion.
Actionable Implementation Tips
A systematic approach to inspecting paint and siding ensures no detail is overlooked, from the initial prep work to the final walkthrough.
- Document Surface Preparation: Require photographic proof that surfaces were properly cleaned, patched, and sanded before priming. This is the most critical factor for paint adhesion and a smooth finish.
- Inspect Under Various Lighting: Check paint color and uniformity under both natural daylight and artificial lighting. Colors can appear different, and imperfections like flashing or uneven sheen become more visible under angled light.
- Verify Product Specifications: Confirm that the correct paint type and sheen are used for each area. For instance, high-humidity areas like bathrooms require specific formulations, so it's important to choose the right paint for bathroom walls.
- Check Siding Alignment and Fastening: Use a level to check for straight, consistent siding courses. Ensure fasteners are driven correctly to allow for natural expansion and contraction without buckling.
- Review Weatherproofing Details: Meticulously inspect all caulking around trim, windows, and doors. Ensure it is applied neatly and creates a continuous, watertight seal.
7. Flooring Installation and Subfloor Condition Inspection
A proper flooring installation goes far beyond the surface appearance; it starts with the crucial inspection of the subfloor. This step involves a detailed assessment of the subfloor's condition, including its structural integrity, flatness, and moisture levels, before any new flooring is laid. Verifying these foundational elements is a non-negotiable part of any construction quality control checklist, as it directly impacts the longevity, performance, and aesthetic of the final floor.
This process ensures that materials are properly acclimated and installed according to manufacturer specifications, preventing common issues like buckling, gapping, or lippage (unevenness between planks or tiles). A flawless floor is a high-visibility element, and this quality check guarantees both its beauty and its durability.
Why This Step Is Critical
The subfloor is the foundation of your new flooring. Installing expensive materials over a compromised subfloor is a recipe for premature failure. An unlevel surface can cause planks to squeak or separate, while excessive moisture can lead to warping, cupping, or mold growth, completely ruining the investment.
- Example 1 (Kitchen Hardwood): Before installing oak flooring, a contractor uses a moisture meter and finds a high reading near the dishwasher line. This allows them to address a slow, unseen leak first, preventing the new hardwood from warping and saving thousands in future repairs.
- Example 2 (Bathroom Tile): During a bathroom remodel, the inspection reveals the subfloor isn't properly sloped toward the drain. The team corrects this before tiling, ensuring proper drainage and preventing water from pooling, which could damage the subfloor and ceiling below.
Actionable Implementation Tips
To guarantee a long-lasting and beautiful floor, focus on meticulous subfloor preparation and adherence to installation best practices. A systematic approach is key.
- Test for Moisture: Use a calibrated moisture meter to test the subfloor, especially in moisture-prone areas like kitchens, bathrooms, and basements. For wood floors, moisture content should typically be below 2% relative to the flooring material.
- Verify Material Acclimation: Document the acclimation period for materials like hardwood or laminate. Record timestamps, temperature, and humidity to confirm they have adjusted to the home's environment as per manufacturer guidelines.
- Check for Levelness: Use a long, straight level to check for high or low spots in the subfloor. Address any significant variations before installation begins.
- Establish Tolerances: Define acceptable lippage standards (e.g., no more than 1/8" difference in height between adjacent tiles or planks) and ensure grout lines are consistent in width and fully filled.
- Review Installation Guidelines: Always have the flooring manufacturer's specific installation manual on-site and follow it precisely, especially regarding underlayment and fastener requirements.
8. Cabinet Installation and Fit Inspection
A precision inspection of cabinet installation is a non-negotiable step in any high-quality kitchen or bathroom remodel. This process involves a detailed verification of everything from structural integrity to aesthetic alignment, ensuring the final result is both beautiful and functional. Because cabinetry is a major visual and financial investment, this stage of a construction quality control checklist demands meticulous attention to prevent long-term issues with daily-use items.
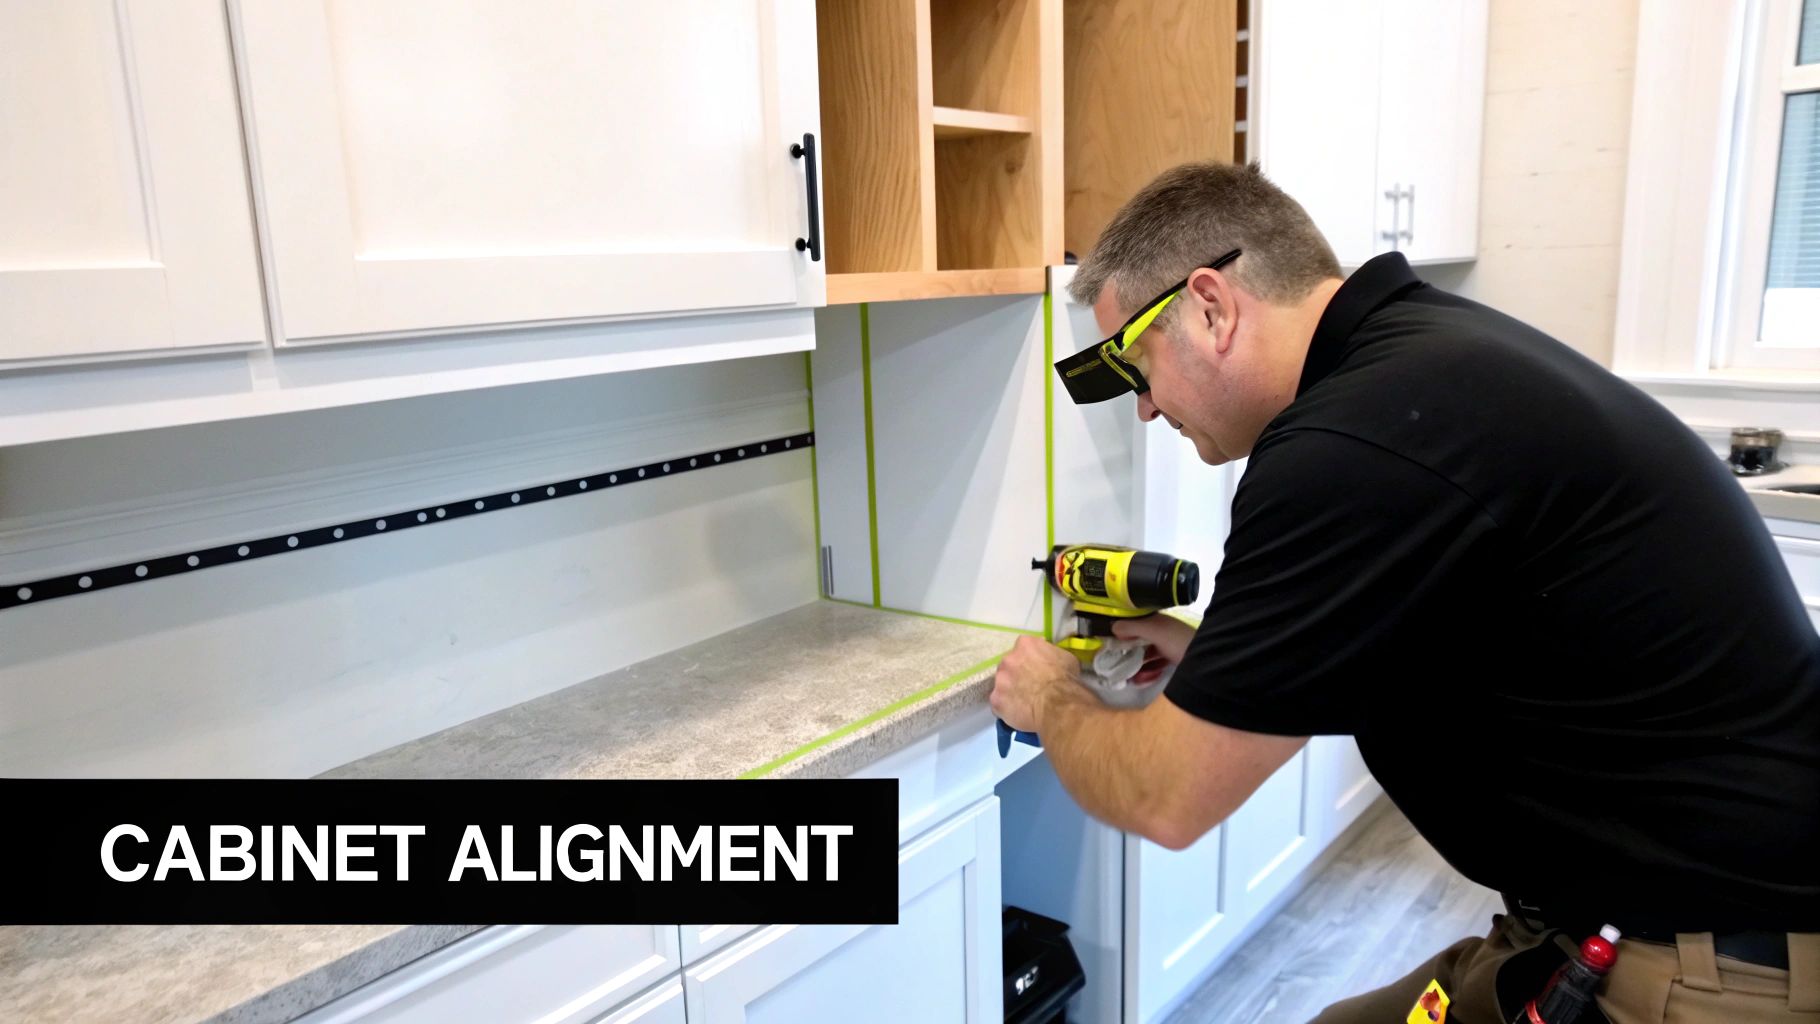
This step confirms that cabinets are securely fastened, perfectly level, and that all moving parts operate flawlessly. It prevents the frustration of misaligned doors, binding drawers, and the potential for cabinets to pull away from the wall over time, ensuring the longevity and usability of the most-used elements in a kitchen or bathroom.
Why This Step Is Critical
Improperly installed cabinets can lead to a cascade of problems, from uneven countertops to premature wear on hinges and drawer slides. A thorough fit and finish inspection catches these errors early, avoiding costly and disruptive repairs down the road. It ensures the homeowner receives the quality they paid for.
- Example 1 (Kitchen Remodel): During inspection, a contractor confirms a custom island is perfectly level and securely fastened to blocking within the subfloor. This prevents the heavy quartz countertop from causing the island to shift or tilt over time.
- Example 2 (Bathroom Vanity): An installer checks the alignment of vanity drawers and tests the soft-close mechanisms. They discover one slide is slightly stiff, allowing for a simple adjustment on the spot rather than a callback from a frustrated homeowner later.
Actionable Implementation Tips
Achieving a flawless cabinet installation requires a systematic approach that starts before the first box is hung and ends with a detailed final review.
- Verify Wall Plumb: Use a laser level to check that walls are plumb and flat before installation. Shims may be required to ensure cabinets hang straight on uneven walls.
- Document Fastening: Locate and mark studs clearly. Require pilot holes for all fasteners to prevent wood splitting and ensure a solid connection. Photograph the fastened cabinets before they are filled.
- Test All Operations: Open and close every single door and drawer multiple times. Check for smooth, consistent operation without any binding or rubbing. Verify that soft-close mechanisms engage properly.
- Inspect Gaps and Alignment: Look for consistent, even gaps between all doors and drawer fronts. Sightlines should be straight and parallel with floors and ceilings.
- Create a Punch List: Under bright lighting, inspect all finished surfaces for scratches, chips, or blemishes. Compile a detailed punch list of any required adjustments or touch-ups for the installer to complete before final sign-off.
9. Tile Installation and Grout Quality Inspection
A meticulous tile and grout inspection is a non-negotiable step for any project involving tiled surfaces, particularly in moisture-prone areas like kitchens and bathrooms. This process involves a detailed assessment of everything from the substrate preparation to the final sealing, ensuring the installation is both aesthetically pleasing and functionally durable. It is a critical component of a construction quality control checklist, as it prevents premature failures like cracked grout, loose tiles, and water damage.
This inspection verifies proper layout, pattern alignment, spacing consistency, and adequate mortar coverage. It catches common defects like lippage (uneven tile height) and grout voids before they become significant issues, safeguarding the longevity and appearance of the finished surface.
Why This Step Is Critical
Poor tile work is not just a cosmetic problem; it can lead to serious structural and water-related issues. A hollow tile in a shower can trap water, leading to mold growth and substrate rot, while inconsistent grout joints detract from the overall quality of the finish. A thorough inspection ensures the installation will perform as intended for years.
- Example 1 (Bathroom Shower): During inspection, a contractor taps on newly installed shower wall tiles and hears a hollow sound on several pieces. This indicates poor thinset mortar coverage. The tiles are removed and properly re-installed, preventing future water intrusion behind the tile and potential wall damage.
- Example 2 (Kitchen Backsplash): An inspector checks the grout lines of a new backsplash and notices the color is slightly different in one corner. By checking the grout batch numbers documented by the installer, they confirm two different batches were used. The inconsistent section is re-grouted to ensure a uniform, professional finish.
Actionable Implementation Tips
To ensure a flawless tile installation, establish clear standards before work begins and follow a systematic inspection process. The goal is to verify both the visual appeal and the technical integrity of the work.
- Establish Lippage Tolerances: Agree on an acceptable lippage (tile-to-tile height difference) standard before installation, typically no more than 1/16". Use a straightedge to check for compliance.
- Verify Mortar Coverage: Systematically tap each tile with a finger or a small mallet. A hollow sound indicates a void, which is a significant defect requiring correction.
- Check Grout Consistency: Ensure grout joints are uniform in width and fully packed without voids or pinholes. Document grout color and batch information to ensure a perfect match for any future repairs.
- Confirm Proper Sealing: Once the grout has fully cured (typically 24-48 hours), verify that a high-quality sealer has been applied according to the manufacturer's specifications, especially for porous tiles and grout in wet areas.
- Final Inspection Post-Cure: Conduct the final sign-off inspection only after the grout has cured and the sealer has been applied and dried completely.
10. Final Walkthrough and Punch List Documentation
The final walkthrough is the culminating checkpoint of the entire project, where the homeowner and contractor jointly inspect the completed work against the agreed-upon scope and quality standards. This is where a formal "punch list," a document detailing any remaining deficiencies or incomplete items, is created. It serves as the definitive to-do list for project closeout, ensuring all expectations are met before final payment is released. This step is a non-negotiable part of any robust construction quality control checklist, marking the transition from construction to completion.
This collaborative inspection confirms that every detail, from functional systems to aesthetic finishes, aligns with the contract. It prevents misunderstandings and provides a clear, documented path to resolving any final issues, guaranteeing the homeowner's satisfaction and formalizing the project's conclusion.
Why This Step Is Critical
Without a structured final walkthrough and a documented punch list, project closeout can become messy and contentious. Minor issues can be overlooked, leading to lingering dissatisfaction, while the absence of a formal sign-off leaves the project's "completion" ambiguous. This process protects both parties by creating a transparent and mutually agreed-upon roadmap for the final tasks.
- Example 1 (Kitchen Remodel): During the walkthrough, the homeowner notices a cabinet door isn't aligned and the under-cabinet lighting flickers. These items are added to the punch list. The contractor agrees to fix them within one week, and this is documented, ensuring a clear resolution before the final invoice is paid.
- Example 2 (Bathroom Renovation): The inspection reveals a small chip in a newly installed tile and inconsistent paint sheen behind the door. These details are photographed and added to the punch list, preventing future disputes and guaranteeing the finish quality meets the expected standard.
Actionable Implementation Tips
To ensure a smooth and effective project closeout, the final walkthrough must be systematic and well-documented. The goal is to leave no stone unturned and to establish clear, actionable next steps.
- Use a Standardized Punch List Template: Employ a consistent template that categorizes items by room or trade (e.g., electrical, plumbing, paint). This keeps the list organized and easy to track.
- Photograph Every Item: For each punch list item, take a clear photo. This visual evidence eliminates ambiguity and serves as a precise reference for the repair crew.
- Establish a Clear Remediation Deadline: Agree on a reasonable timeframe for completing all punch list items, typically 5 to 10 business days, and document this on the sign-off sheet.
- Formal Sign-Off: Both the homeowner and contractor should sign the completed punch list. This signature confirms agreement on the identified items and the timeline for their correction.
- Prepare a Final Documentation Package: Upon completion of punch list items, the contractor should provide a handover package including all product warranties, user manuals for new appliances, and any maintenance instructions.
10-Point Construction Quality Control Comparison
| Item | 🔄 Implementation Complexity | ⚡ Resource Requirements | 📊 Expected Outcomes | 💡 Ideal Use Cases | ⭐ Key Advantages |
|---|---|---|---|---|---|
| Pre-Construction Site Assessment and Documentation | Moderate — systematic inspection, documentation steps | ⚡ Low–Moderate: camera, templates, time, cloud storage | Baseline record, fewer liability disputes, accurate scoping | 💡 Full-scale renovations, major repairs, project kickoff | ⭐ Liability protection; clear expectations and scope control |
| Material Inspection and Verification at Delivery | Moderate — on-delivery checks and verification | ⚡ Moderate: trained staff, checklists, storage space | Prevents defective/incorrect materials entering site; preserves warranty | 💡 Finish-sensitive projects (kitchens, baths, cabinetry) | ⭐ Reduces rework and color/grade mismatches |
| Framing and Structural Inspection | High — code checks, structural verification | ⚡ High: certified inspector/engineer, measurement tools | Ensures structural safety and code compliance; prevents rework | 💡 Wall removals, room reconfigurations, additions | ⭐ Protects safety and avoids costly retrofit corrections |
| Mechanical, Electrical, and Plumbing (MEP) Systems Inspection | High — technical, multi-trade verification | ⚡ High: licensed trades, testing equipment, pressure/voltage tests | Functional, code-compliant systems; fewer concealed failures | 💡 Kitchen/bath remodels with system upgrades; HVAC changes | ⭐ Prevents hazardous failures and permits issues |
| Drywall Installation and Finishing Quality Inspection | Moderate — multi-phase visual/tactile checks | ⚡ Low–Moderate: experienced inspector, strong lighting, straightedge | Smooth, paint-ready surfaces; fewer finish-stage corrections | 💡 Interior remodels, accent walls, prep for painting | ⭐ Improves final aesthetics; cost-effective early fixes |
| Paint and Siding Inspection (Interior & Exterior) | Moderate — surface prep and environmental considerations | ⚡ Moderate: samples, lighting, weather monitoring, caulking tools | Uniform finish, weatherproofing, enhanced curb appeal | 💡 Interior finishes, exterior repainting, siding work | ⭐ Visible quality that preserves value and prevents water intrusion |
| Flooring Installation and Subfloor Condition Inspection | Moderate–High — moisture, flatness, acclimation checks | ⚡ Moderate: moisture meters, leveling tools, time for acclimation | Stable, durable floors with reduced buckling/lippage | 💡 Kitchens, bathrooms, whole‑house flooring projects | ⭐ Prevents moisture damage and extends flooring lifespan |
| Cabinet Installation and Fit Inspection | Moderate — precision alignment and hardware testing | ⚡ Moderate: laser level, skilled installers, hardware testing | Proper function, consistent gaps, damage avoidance | 💡 Kitchen cabinets, islands, bathroom vanities | ⭐ Protects major investment; ensures long-term usability |
| Tile Installation and Grout Quality Inspection | High — substrate, mortar, curing, and grout precision | ⚡ Moderate–High: spacers, mortars, sealing materials, curing time | Durable, water-resistant tile with uniform appearance | 💡 Showers, backsplashes, tiled floors | ⭐ Prevents tile failure and grout staining; ensures water integrity |
| Final Walkthrough and Punch List Documentation | Low–Moderate — coordinated review and documentation | ⚡ Low: punch-list template, photos, time for review | Documented completion status, agreed remediation timeline | 💡 All projects at completion / pre-final payment | ⭐ Formal acceptance, fewer disputes, clear closeout process |
Turning Your Checklist into a Masterpiece Renovation
Embarking on a renovation project without a systematic plan is like setting sail without a compass. You might eventually reach a destination, but the journey will be fraught with uncertainty, detours, and potential disasters. The detailed, stage-by-stage construction quality control checklist we have outlined serves as your project's navigational chart, guiding every decision and action from the initial site assessment to the final, satisfying walkthrough. It transforms the abstract concept of "quality" into a series of tangible, verifiable, and measurable benchmarks.
This framework is not merely about ticking boxes. It's about fostering a culture of accountability and precision. When you move from pre-construction documentation to inspecting MEP rough-ins and verifying drywall finishes, you are actively participating in the creation of your home's future. You are replacing assumptions with data, and hope with documented proof. This systematic approach demystifies the construction process, empowering homeowners to ask informed questions and enabling contractors to demonstrate their commitment to excellence.
From Checklist to Cornerstone of Quality
The true power of this checklist lies in its ability to prevent problems before they become permanent. Identifying an out-of-plumb wall during the framing inspection is a straightforward fix; discovering it after the drywall is painted and cabinets are hung is a costly and disruptive ordeal. Similarly, verifying material deliveries against the project specifications ensures the foundation, finishes, and fixtures align with your vision and budget, eliminating the risk of substandard substitutions that could compromise both aesthetics and longevity.
Think of each checkpoint as a critical "quality gate":
- The Framing Inspection: This is the skeleton of your project. Ensuring it is square, level, and properly secured is non-negotiable for everything that follows.
- The MEP Rough-in Verification: This checkpoint guarantees the vital systems that make your home functional and safe are correctly installed before they are concealed behind walls.
- The Finishes Review (Drywall, Paint, Flooring): These are the elements you will see and interact with every day. Meticulous inspection here ensures the final aesthetic is flawless and professional.
By breaking down a complex remodel into these manageable, inspectable stages, you create a transparent workflow. This clarity builds trust between you and your contractor, turning a potentially adversarial process into a collaborative partnership focused on a shared goal: a beautifully executed renovation.
Activating Your Quality Control Plan
Knowledge is only potential power; action is what truly transforms it. Your next step is to adapt this comprehensive construction quality control checklist into a living document for your specific project. Customize it with your material selections, architectural plans, and personal expectations. Use it as the central agenda for your regular site meetings with your contractor. Take photos, document measurements, and formally sign off on each stage before allowing work to proceed.
Key Takeaway: A proactive quality control process does not add time to a project; it protects the timeline. By catching issues early, you eliminate the delays and budget overruns caused by extensive rework, ensuring a smoother, more predictable renovation experience.
Ultimately, mastering this process means investing in the long-term value and enjoyment of your home. It ensures that the final result is not just a cosmetic upgrade but a fundamentally sound, durable, and well-crafted space. The discipline of diligent quality control is what separates an adequate renovation from an exceptional one-a space that isn't just finished, but is truly a masterpiece.
Ready to partner with a team that has quality control built into its DNA? The principles in this construction quality control checklist are the standard operating procedure for every project we undertake at Garner Construction & Maintenance. We invite you to experience the peace of mind that comes from working with a contractor who is as committed to the details as you are. Visit us at Garner Construction & Maintenance to see how our meticulous process can bring your vision to life with uncompromising quality.