
A stunning kitchen renovation often feels like a luxury reserved for huge budgets and lengthy timelines, but a high-impact transformation is more accessible than you might imagine. The secret isn't necessarily spending more money; it's about spending smarter. Many homeowners believe a full gut renovation is the only path to a modern, functional kitchen, but that assumption can lead to unnecessary expenses and project delays. The reality is that targeted, strategic upgrades can deliver a dramatic new look and feel for a fraction of the cost. This guide is built on that principle, offering a comprehensive roundup of affordable kitchen remodel ideas designed to deliver the most significant visual and functional improvements without the hefty price tag.
We will move beyond generic advice and dive into actionable strategies that make a tangible difference. Instead of just suggesting you "paint your cabinets," we'll break down the pros and cons of refacing versus painting. Instead of a vague tip to "update lighting," we will explore specific, cost-effective fixture types and placement for maximum impact. This listicle breaks down 10 powerful, budget-conscious projects, complete with practical implementation steps, realistic cost estimates, and professional insights to help you prioritize where your investment will count the most. Whether you're a dedicated DIYer ready for a weekend project or planning to hire a professional for specific tasks, these concepts prove that a beautiful, modern, and highly functional kitchen is well within your reach, regardless of your budget.
1. Cabinet Refacing and Paint
If your kitchen cabinets are structurally sound but stylistically stuck in the past, a full replacement is often unnecessary and expensive. Cabinet refacing and painting are two of the most impactful and affordable kitchen remodel ideas available, offering a dramatic visual overhaul for roughly 40-50% less than the cost of new custom cabinetry. This approach focuses on updating the visible surfaces while preserving the existing cabinet boxes, saving significant time, money, and materials.
The Two Paths: Paint vs. Reface
Choosing between painting and refacing depends on your cabinet style and budget.
- Painting: Ideal for homeowners who like their cabinet door style but want a color change. A professional-grade paint job can completely transform dated honey-oak or dark wood cabinets into a modern marvel. Popular color choices that enhance timeless appeal and resale value include crisp whites, sophisticated grays, deep navy blues, and subtle sage greens.
- Refacing: This more comprehensive option involves replacing the old cabinet doors and drawer fronts with new ones and applying a matching veneer to the exterior of the cabinet boxes. This is the perfect solution if you want to switch from a traditional raised-panel door to a clean, contemporary Shaker style.
Tips for a Professional-Quality Finish
Achieving a durable, factory-like finish requires meticulous preparation and the right materials.
- Preparation is Key: Proper cleaning, degreasing, sanding, and priming are non-negotiable steps. Skipping these will lead to poor paint adhesion, resulting in chipping and peeling down the road.
- Invest in Quality Materials: Use paint specifically formulated for cabinetry, such as Benjamin Moore's ADVANCE or Sherwin-Williams' Emerald Urethane Trim Enamel. These self-leveling paints cure to a hard, durable finish that withstands the daily wear and tear of a busy kitchen.
- Hardware as Jewelry: Don't underestimate the power of new hardware. Replacing old knobs and pulls with modern matte black, brushed brass, or polished nickel options is the final touch that elevates the entire look.
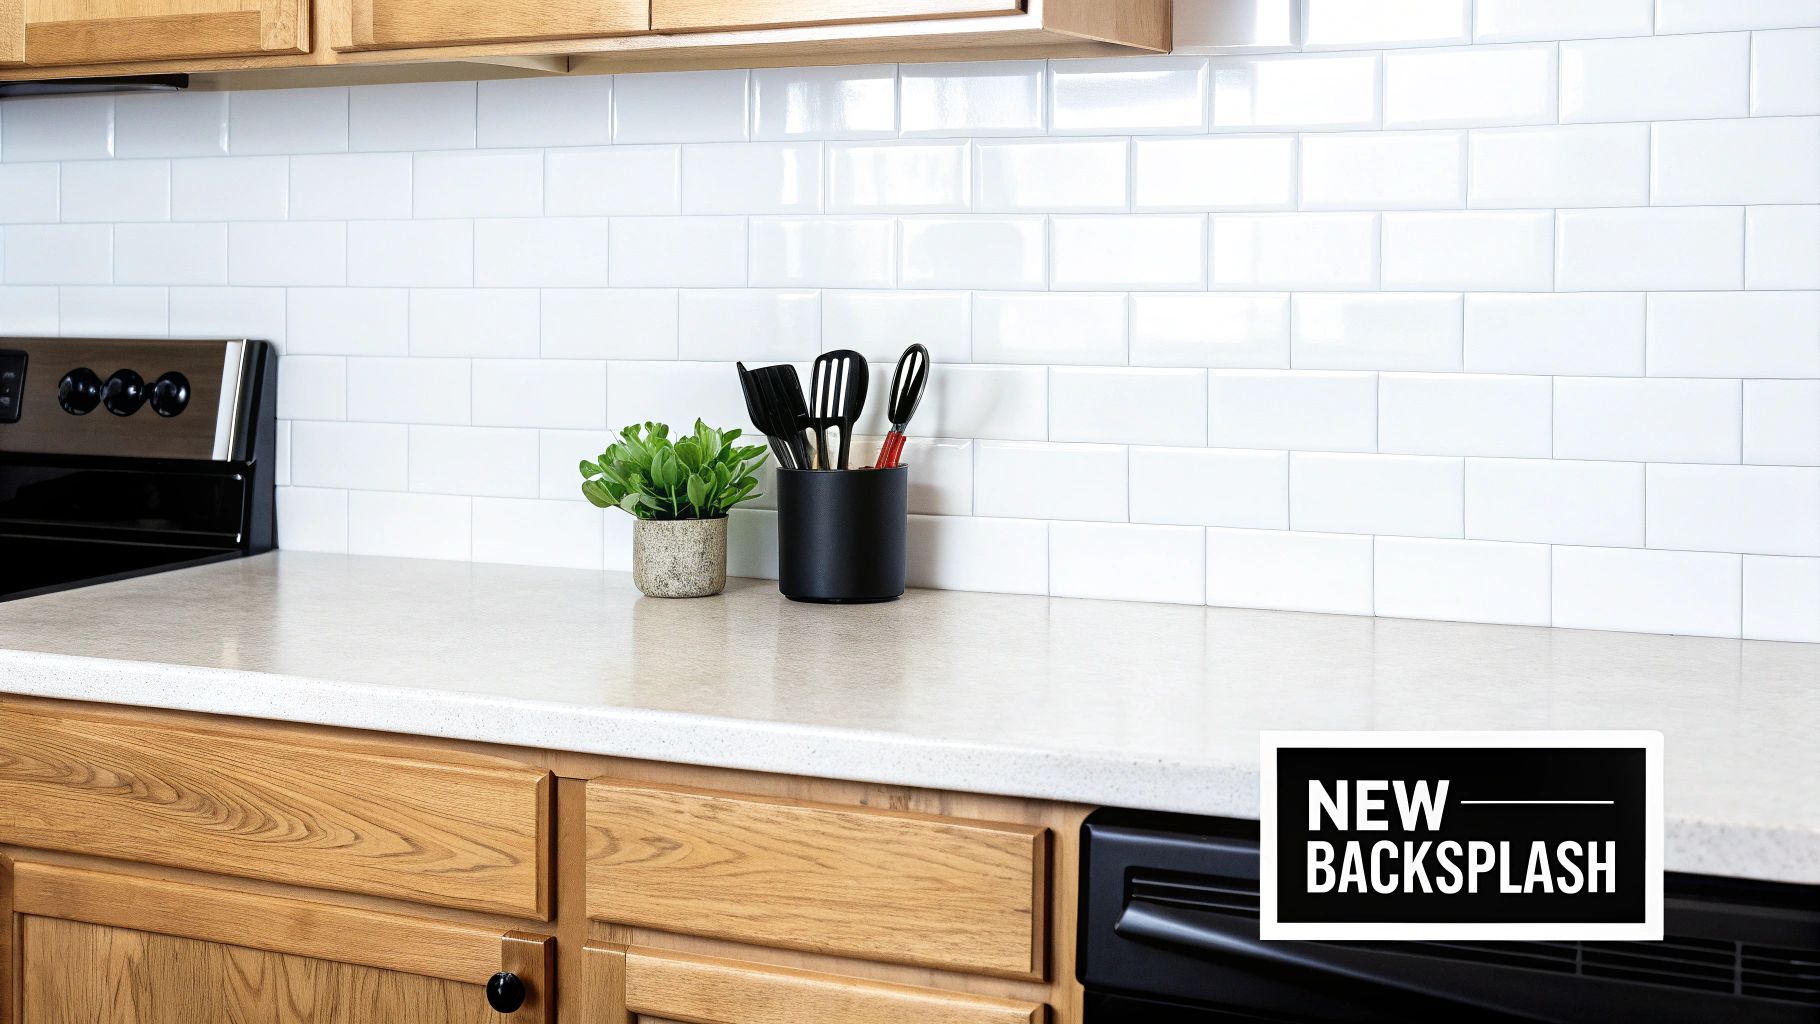
2. Backsplash Upgrade (Peel-and-Stick & Budget Tile)
The backsplash is a focal point in the kitchen, and upgrading it is one of the most effective affordable kitchen remodel ideas for adding personality and style. Often covering a relatively small area, this project delivers a high visual return on a minimal investment. Modern options like peel-and-stick tiles and budget-friendly ceramic tiles allow homeowners to achieve a designer look without the hefty price tag, protecting walls from grease and splashes in the process.
The Two Paths: Peel-and-Stick vs. Traditional Tile
Your choice depends on your budget, DIY skill level, and long-term durability needs.
- Peel-and-Stick Tiles: This is the ultimate DIY-friendly solution, perfect for renters or those seeking a quick, low-cost update. These self-adhesive panels come in a vast array of styles, from classic white subway tile to intricate mosaic patterns, and can be installed in an afternoon with minimal tools. They offer a temporary yet stylish fix that completely changes the room's feel.
- Budget Ceramic or Porcelain Tile: For a more permanent and durable solution, affordable ceramic or porcelain tiles are an excellent choice. Classic options like 3x6 inch subway tiles can be found for less than a few dollars per square foot. While this requires more effort, including mortar and grout, the result is a timeless, high-value finish that adds genuine equity to your home.
Tips for a Professional-Quality Finish
A successful backsplash installation, whether peel-and-stick or traditional tile, hinges on careful preparation and execution.
- Preparation is Key: For both methods, start with a completely clean, dry, and smooth wall. Use a degreaser to remove any kitchen residue. For peel-and-stick, this ensures strong adhesion; for traditional tile, it prevents bonding issues with the mortar.
- Plan Your Layout: Before applying anything, measure the wall and mark a level starting line, usually in the center. A well-planned layout prevents awkward, small cuts at the edges and creates a balanced, professional look.
- Finishing Touches Matter: For peel-and-stick, use a J-roller to press every tile firmly, ensuring a secure bond. For traditional tile, sealing the grout is a crucial step to prevent stains and moisture damage. Choose a grout color that complements your tiles, such as a contrasting dark gray for white subway tile to make the pattern pop.
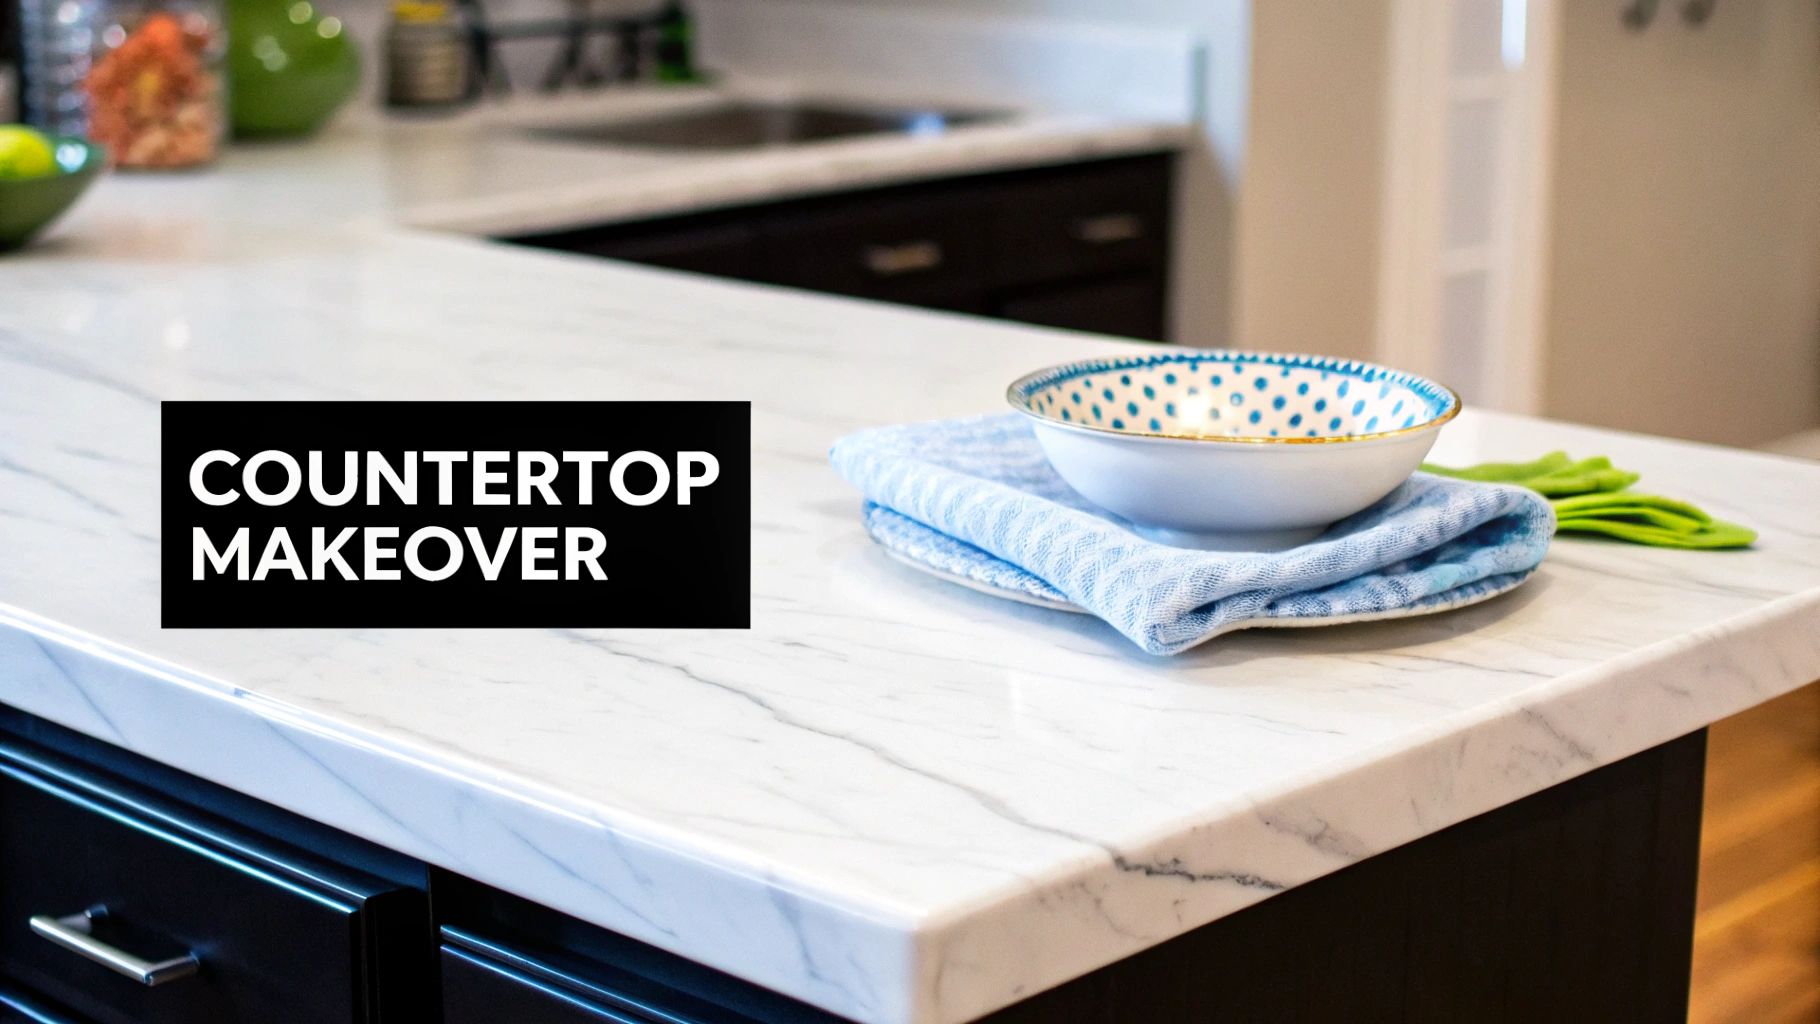
3. Countertop Overlay or Paint
Your countertops are a dominant visual element in the kitchen, but replacing them with high-end materials like granite or quartz can consume a large portion of your budget. Countertop overlays and specialized refinishing kits offer a brilliant workaround. These affordable kitchen remodel ideas allow you to achieve the look of expensive stone or solid surfaces for a fraction of the cost by covering or recoating your existing, structurally sound countertops.
The Two Paths: Paint vs. Overlay
The right choice depends on your existing countertop material and the final look you want to achieve.
- Painting/Refinishing: This is an excellent DIY-friendly option for updating dated laminate, Formica, or even tile countertops. High-quality countertop paint or epoxy kits, like those from Giani Granite, are specifically designed to mimic the appearance of stone. You can create a convincing granite or marble look with multi-step applications of primers, mineral paints, and a durable epoxy topcoat.
- Overlays: If your countertops have significant damage or you prefer a seamless, solid surface, an overlay is a great solution. This involves applying a thin sheet of material like laminate veneer or solid surface directly over the existing counter. This method completely hides the old surface and can provide a more uniform and durable finish than paint.
Tips for a Professional-Quality Finish
A successful countertop transformation hinges on careful execution and attention to detail.
- Preparation is Key: The surface must be impeccably clean, degreased, and lightly sanded to ensure the new finish adheres properly. Any shortcuts here will compromise the durability of your new countertop surface.
- Invest in Quality Materials: Opt for kits and materials specifically made for countertops. Standard wall paint will not hold up to the high traffic, moisture, and cleaning that kitchen counters endure. A high-quality epoxy topcoat is crucial for a lasting, food-safe finish.
- Achieve Clean Edges: Use high-quality painter's tape to protect your backsplash, sink, and appliances for crisp, professional-looking lines. For overlays, adding new edge trim can provide a polished, finished look that conceals the old countertop edge completely.
While these methods are great budget solutions, it's also wise to understand the full range of material options. For a deeper dive into the pros and cons of different surfaces, you can learn more about how to choose kitchen countertops for your project.
4. Budget-Friendly Hardware and Fixtures Swap
Often overlooked, the small details in a kitchen carry immense visual weight. Swapping out dated hardware and fixtures is one of the quickest and most affordable kitchen remodel ideas, offering an outsized impact for a minimal investment. This approach allows you to inject modern style and improved functionality into your space in as little as a single afternoon, completely altering the room's character without any demolition. Think of hardware and fixtures as the jewelry of your kitchen; a simple change can elevate the entire ensemble.
Two High-Impact Areas: Hardware and Fixtures
You can tackle these projects together or separately, depending on your budget and goals.
- Cabinet Hardware: Replacing dated, builder-grade knobs and pulls is a transformative five-minute task per door or drawer. Shifting from 1990s polished brass to sleek matte black, elegant brushed brass, or classic polished nickel can instantly modernize your cabinetry. The contrast of dark hardware on light cabinets, or metallic finishes on dark cabinets, creates a sophisticated, high-design look.
- Faucets and Lighting: Upgrading functional fixtures provides both aesthetic and practical benefits. Replacing a basic, low-profile faucet with a high-arc, pull-down model enhances usability for washing large pots and pans. Similarly, swapping a single flush-mount ceiling light for stylish pendant lights over an island or a modern chandelier over a dining nook adds layers of light and a dramatic focal point.
Tips for a Seamless and Stylish Swap
A successful swap is all about planning and selecting the right pieces for your space.
- Measure First, Buy Second: Before purchasing new cabinet hardware, measure the center-to-center distance between the screw holes on your existing pulls to ensure a perfect fit without needing to drill new holes. For faucets, confirm the number of mounting holes in your sink or countertop to match the new fixture's requirements.
- Coordinate but Don't Over-Match: Choose finishes that complement your existing appliances and overall kitchen style. For a curated, designer look, don't be afraid to mix metals strategically. For example, matte black cabinet pulls can pair beautifully with a brushed brass faucet and light fixtures.
- Prioritize Quality in High-Use Items: While it's tempting to opt for the cheapest option, invest in a quality faucet from a reputable brand. This is one of the most heavily used items in the kitchen, and a durable, well-made fixture will prevent leaks and performance issues down the line.
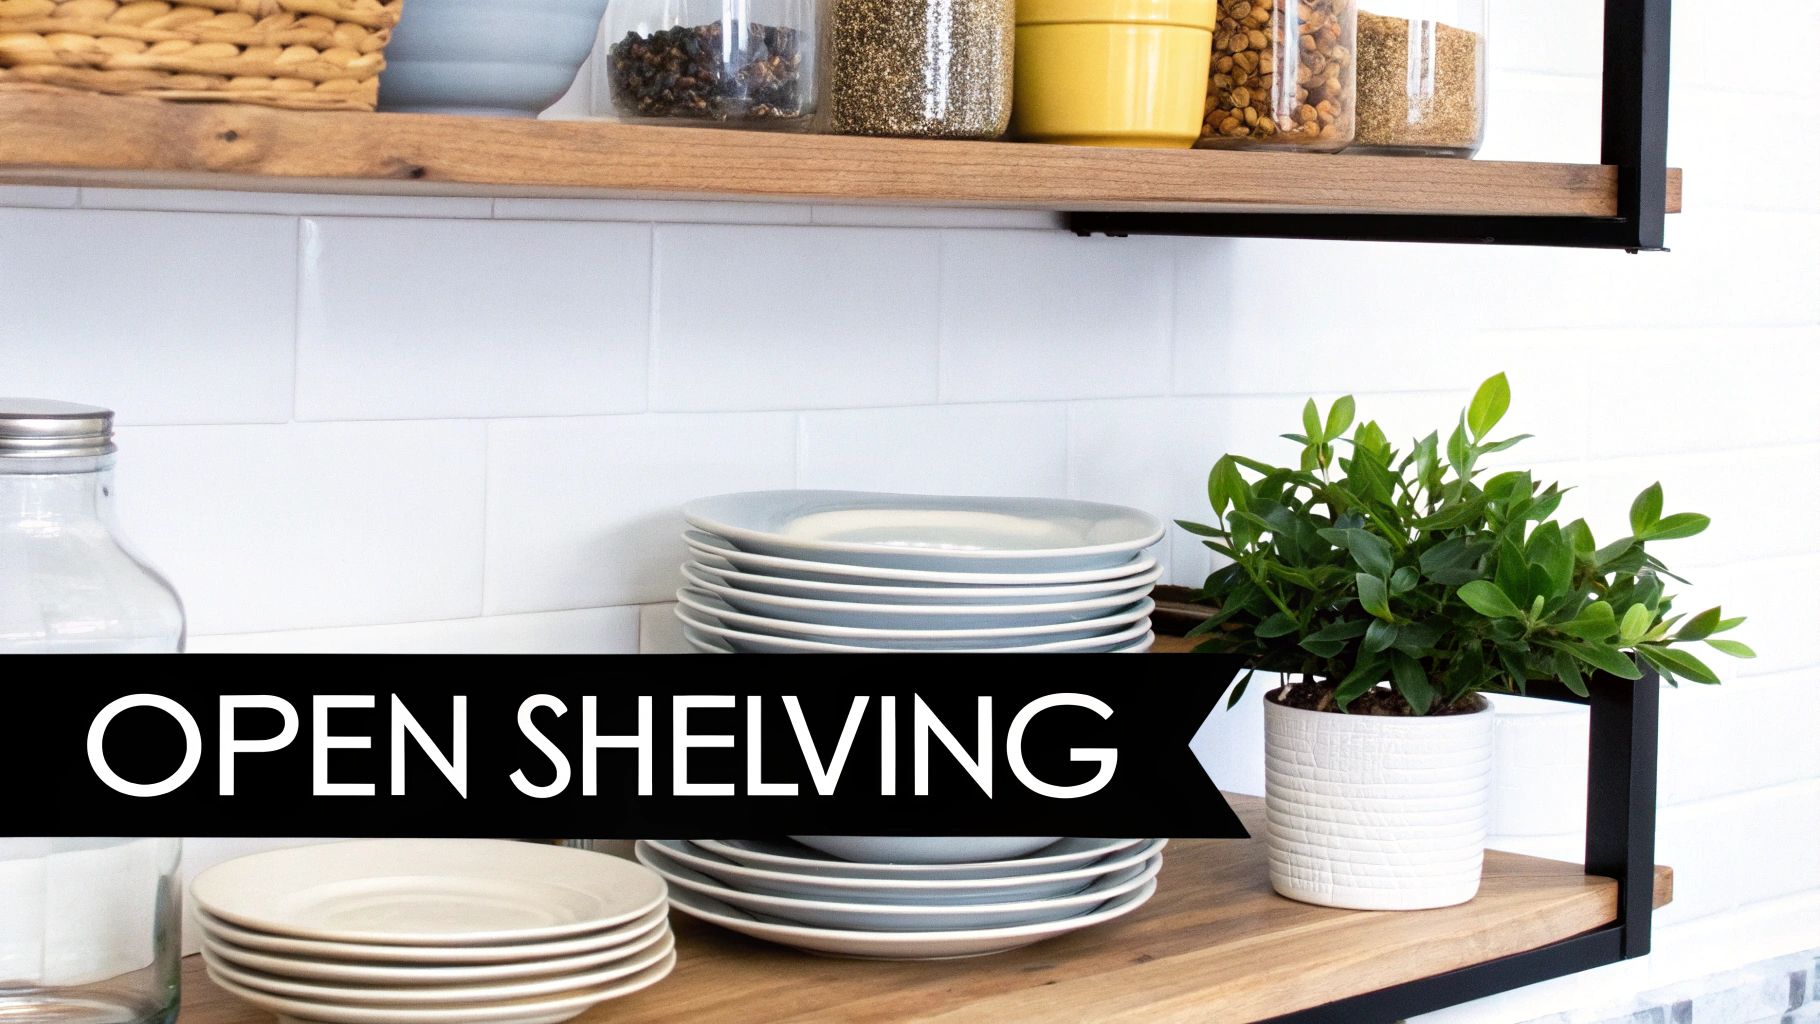
5. Open Shelving Conversion
Replacing bulky upper cabinets with open shelving is a stylish and cost-effective strategy to make a kitchen feel larger, brighter, and more personal. This approach removes the visual weight of solid cabinet doors, creating an airy, open atmosphere that is particularly effective in smaller or galley-style kitchens. As one of the most accessible affordable kitchen remodel ideas, it allows you to display attractive dishware, glassware, and decor, turning everyday items into a design feature.
Achieving a Curated and Functional Look
The success of open shelving hinges on thoughtful curation and a balance between aesthetics and practicality. It's not just about removing doors; it's about creating an intentional display.
- Farmhouse & Rustic: Use thick, reclaimed wood shelves on black metal brackets to showcase vintage stoneware, mason jars, and classic white dishware.
- Modern & Minimalist: Opt for sleek, floating shelves in a color that matches the wall for an almost-invisible look. Display a coordinated set of glasses and minimalist ceramic bowls.
- A Balanced Approach: You don't have to go all-in. Consider replacing just one or two upper cabinets with shelves, perhaps flanking a window or range hood, to create a focal point while retaining most of your enclosed storage.
Tips for Successful Open Shelving
To keep your shelves looking styled instead of cluttered, organization and careful planning are essential.
- Curate Your Collection: Before you start, decide exactly what you will display. Open shelving is best for your most-used and most-attractive items, like matching dinner plates, bowls, and coffee mugs.
- Prioritize Accessibility: Place everyday items on the lower, easy-to-reach shelves. Less frequently used or purely decorative pieces can go higher.
- Use Baskets and Bins: Keep smaller, less-attractive items (like spice packets or tea bags) contained and organized by using stylish baskets or canisters. This prevents visual chaos and keeps things tidy.
- Ensure Proper Installation: Shelves holding heavy dishes must be anchored securely into wall studs. Check the weight rating for both the shelves and the brackets to prevent sagging or accidents.
6. Budget Flooring Upgrades (Vinyl Plank or Ceramic Tile)
The kitchen floor endures constant traffic, spills, and dropped utensils, making durability as important as aesthetics. Fortunately, achieving a high-end look without the high-end price tag is entirely possible with modern flooring materials. Luxury vinyl plank (LVP) and ceramic or porcelain tile are two of the best affordable kitchen remodel ideas, offering incredible resilience and style that convincingly mimic expensive materials like hardwood and natural stone for a fraction of the cost.
The Two Paths: Vinyl vs. Tile
Your choice between LVP and tile often comes down to desired look, installation complexity, and underfoot feel.
- Luxury Vinyl Plank (LVP): This is the ultimate chameleon of flooring. Modern LVP products like those from Coretec or Shaw offer hyper-realistic wood and stone visuals, complete with authentic textures. It is 100% waterproof, highly scratch-resistant, and warmer and softer underfoot than tile, making it a comfortable and practical choice for busy kitchens where you spend a lot of time standing.
- Ceramic & Porcelain Tile: For timeless durability and design versatility, tile is a classic kitchen champion. It is exceptionally tough and waterproof, making it impervious to most spills and damage. From large-format tiles that mimic concrete for a modern look to intricate patterned tiles for a Mediterranean feel, the design possibilities are nearly endless.
Tips for a Professional-Quality Installation
A successful and long-lasting floor depends on careful installation and proper material handling.
- Preparation is Key: The subfloor must be perfectly clean, dry, and level before you begin. Any imperfections in the subfloor will telegraph through to the final surface, potentially causing planks to separate or tiles to crack over time.
- Invest in Quality Materials: Beyond the flooring itself, don't skimp on a quality underlayment for LVP to improve sound dampening and comfort. For tile, use appropriate spacers to ensure consistent grout lines and be sure to seal the grout after it cures to prevent staining and moisture penetration.
- Acclimate Your Materials: Both LVP and tile should be left in the room where they will be installed for at least 48-72 hours before installation. This allows the materials to acclimate to the home's temperature and humidity, preventing issues like buckling or gapping after they are laid.
7. Strategic Lighting Upgrades
Often overlooked in favor of more prominent features, a well-executed lighting plan is one of the most transformative yet affordable kitchen remodel ideas. Upgrading outdated fixtures with modern, energy-efficient options dramatically improves functionality, enhances mood, and creates the illusion of a larger, more open space. This strategic approach involves layering different types of light to eliminate shadows, highlight key features, and make the kitchen a more inviting and practical workspace.
The Three Layers of Kitchen Lighting
A successful lighting design combines ambient, task, and accent lighting for a balanced and versatile environment.
- Ambient Lighting: This is the primary, general illumination for the room, often from ceiling-mounted fixtures or recessed cans. Upgrading an old, central dome light to multiple modern recessed LED lights provides a cleaner look and more even light distribution.
- Task Lighting: Focused light directed at key work areas is crucial for safety and efficiency. Under-cabinet LED strips are a non-negotiable for illuminating countertops, making food prep easier and safer. Similarly, stylish pendant lights over an island or sink provide targeted light exactly where it's needed.
- Accent Lighting: This decorative layer adds visual interest and highlights architectural or design elements, such as glass-front cabinets or a unique backsplash. Small spotlights or in-cabinet puck lights can create a high-end, custom feel without a significant investment.
Tips for a Professional-Quality Lighting Plan
Proper selection and placement are key to maximizing the impact of your new lighting.
- Choose the Right Temperature: Opt for LED bulbs with a color temperature between 2700K and 3000K (warm white). This range creates a welcoming, comfortable ambiance that mimics natural light, rather than the harsh, clinical feel of cooler tones.
- Install Dimmers: Adding dimmer switches to your main light sources is a low-cost upgrade that provides incredible flexibility. This allows you to transition from bright, functional light for cooking to a soft, ambient glow for dining or entertaining.
- Prioritize Energy Efficiency: Modern LED technology from brands like Philips, Cree LED, or GE uses up to 80% less energy and lasts 15 to 25 times longer than traditional incandescent bulbs. This upgrade not only improves your kitchen's look but also lowers your utility bills and reduces maintenance.
8. Fresh Paint and Drywall Refresh
Never underestimate the transformative power of paint. A fresh coat on the walls, paired with necessary drywall repairs, is one of the most cost-effective yet impactful affordable kitchen remodel ideas you can undertake. This simple refresh can instantly brighten a dark space, modernize a dated color scheme, and create a clean, well-maintained backdrop that makes every other element in your kitchen look better. For a minimal investment in materials and time, you can completely change the room's atmosphere.
The Two-Part Process: Repair and Revitalize
This approach combines foundational repairs with a cosmetic upgrade for a polished, professional result.
- Drywall Repair: Kitchen walls endure significant wear and tear from moisture, grease, and accidental bumps. Before painting, it’s crucial to patch any holes from old fixtures, repair cracks, and smooth out imperfections. A flawless surface is the canvas for a beautiful paint job, ensuring the final color looks uniform and pristine.
- Painting: A new color can redefine your kitchen’s style. Shifting from a dated beige to a crisp white can make a small kitchen feel larger and more open. Alternatively, introducing a sophisticated greige or a muted sage green accent wall can add a layer of modern elegance. The right paint finish also adds durability and ease of cleaning.
Tips for a Flawless and Lasting Finish
Achieving a durable, professional-looking result hinges on careful preparation and the right product choices.
- Preparation is Critical: Thoroughly clean walls with a degreaser to remove any kitchen grime, which can prevent paint adhesion. Sand any rough patches and apply a quality primer, especially when making a dramatic color change or painting over repaired areas.
- Choose the Right Paint and Finish: Opt for paint specifically designed for high-traffic, high-moisture areas. A satin or semi-gloss finish is ideal for kitchens as it’s durable and easy to wipe clean. Top choices include Benjamin Moore’s Aura Kitchen & Bath paint or Sherwin-Williams’ Duration Home Interior Acrylic Latex.
- Test Colors in Your Space: Always test paint samples on your walls and observe them at different times of day. Kitchen lighting can drastically alter a color’s appearance. Popular, versatile choices include Benjamin Moore's Cloud White and Sherwin-Williams' Alabaster.
9. Decluttering and Organization Systems
One of the most affordable kitchen remodel ideas with the highest functional return on investment is a strategic overhaul of your storage. Before you consider new cabinets, maximize the space you already have. A well-organized kitchen not only feels larger and less chaotic but also transforms your daily cooking and cleaning routines into more efficient, enjoyable experiences. This approach focuses on optimizing every inch of your existing cabinetry and pantry space through smart, low-cost solutions.
Two Paths: DIY Declutter vs. System Integration
Choosing your organization method depends on how much you want to streamline your kitchen's workflow.
- Systematic Decluttering: This is the essential first step and can be a project in itself. Inspired by methods like Marie Kondo's, it involves emptying cabinets and drawers, discarding duplicate or unused items, and grouping like-with-like. This no-cost action immediately frees up valuable real estate and sets the stage for a more functional layout.
- Installing Organizers: After decluttering, targeted storage systems can solve specific pain points. This involves purchasing and installing affordable tools like drawer dividers, pull-out pantry shelves, or cabinet-door-mounted racks to give every item a designated, accessible home.
Tips for a Professional-Quality Organization System
Achieving a kitchen that stays tidy requires thoughtful planning and the right tools.
- Start with Problem Areas: Identify your biggest frustrations first. Is it the chaotic Tupperware drawer, the hard-to-reach corner cabinet, or the cluttered under-sink area? Tackling these zones provides the most significant immediate impact.
- Measure and Plan: Before buying anything from brands like OXO or The Container Store, measure your drawers, cabinets, and pantry shelves precisely. A clear plan ensures you purchase organizers that fit perfectly and serve their intended purpose, which is a key part of how to plan a kitchen remodel.
- Utilize Vertical and Hidden Space: Don't forget the inside of cabinet doors for spice racks or the vertical space on shelves. Shelf risers can double your storage for plates and mugs. An under-sink tension rod is a brilliant, inexpensive trick for hanging spray bottles and freeing up the cabinet floor.
10. Appliance Refresh and Strategic Replacements
A full suite of brand-new appliances can consume a massive portion of a renovation budget, but you don't need to replace everything at once. A strategic appliance refresh is one of the most effective affordable kitchen remodel ideas for modernizing a space. This approach involves selectively replacing one or two highly visible, yet outdated, appliances to create a significant visual upgrade without the cost of a complete overhaul. The focus is on high-impact items that anchor the kitchen's aesthetic.
The Two Paths: Targeted Upgrade vs. Finish Coordination
Choosing which appliance to replace depends on your kitchen's biggest pain points and your overall design goals.
- Targeted Upgrade: This focuses on the single appliance that dates your kitchen the most. Replacing a coil-top electric stove with a sleek, modern induction or gas range, or swapping a dated top-freezer refrigerator for a stainless steel French door model, can single-handedly elevate the room's entire look and feel.
- Finish Coordination: This path is ideal if you have a mix of mismatched appliance colors (e.g., black, white, and bisque). Select a unifying finish like stainless steel, and start by replacing the most prominent appliance. This sets the standard for future replacements, creating a cohesive, planned look over time rather than an expensive, all-at-once purchase.
Tips for a High-Impact, Low-Cost Refresh
Making smart choices ensures your investment delivers the maximum visual and functional return.
- Prioritize Visibility: Focus your budget on the refrigerator and range. These are typically the largest and most central appliances, so updating them offers the biggest visual impact. Dishwashers and microwaves can often wait.
- Invest in a Cohesive Finish: Stainless steel remains the go-to for a universally modern and high-value look. It coordinates well with nearly any cabinet color and countertop material. For a more integrated look, a panel-ready dishwasher that matches your cabinetry can create a seamless, high-end effect.
- Mind the Measurements: Before you buy, meticulously measure the height, width, and depth of the existing appliance space. Also, check clearance for door swings to avoid costly installation surprises. As you plan your budget, you can learn more about the average cost of a kitchen remodel to see how appliance costs fit into the bigger picture.
- Look Beyond the Sticker Price: Compare Energy Star ratings to save money on utility bills over the appliance's lifetime. Budget-friendly brands like GE, Whirlpool, and Frigidaire offer excellent features and reliability without the premium price tag of high-end luxury brands.
10-Point Comparison: Affordable Kitchen Remodel Ideas
| Option | 🔄 Implementation Complexity | ⚡ Resources & Cost | ⭐ Expected Outcome (quality) | 📊 Ideal Use Cases | 💡 Key Advantage / Tip |
|---|---|---|---|---|---|
| Cabinet Refacing and Paint | Moderate — pro refacing; DIY painting possible; 1–2 weeks | Low–Medium; ~40–50% savings vs full replacement | ⭐⭐⭐ — high visual change; durability depends on prep & materials | Budget refresh when cabinet boxes are sound; resale-friendly | Use cabinet-specific paint; replace hardware for max impact |
| Backsplash Upgrade (Peel-and-Stick & Budget Tile) | Low for peel-and-stick; Moderate for ceramic tile; hours to days | Low; Peel-and-stick $100–400; ceramic $300–800 materials, $500–1,500 installed | ⭐⭐–⭐⭐⭐ — good visual impact; peel-and-stick less durable than tile | Renters, quick DIY updates, modest budgets; accent areas | Clean/level surface; tile for longevity; press/roller for adhesion |
| Countertop Overlay or Paint | Moderate — some DIY, epoxy often best by pros | Low–Medium; 60–75% savings vs replacement | ⭐⭐–⭐⭐⭐ — strong visual update; longevity varies (3–5+ years for epoxy) | Dated laminate/tile counters; avoid severely damaged substrates | Thorough cleaning/sanding; use high-quality epoxy and edge trim |
| Budget-Friendly Hardware & Fixtures Swap | Low — mostly DIY with basic tools | Low; $200–1,000 typical for full refresh | ⭐⭐–⭐⭐⭐ — immediate visual effect; limited structural change | Fast style refreshs; staging; when hardware looks dated | Measure holes; coordinate finishes; invest in durable faucets |
| Open Shelving Conversion | Moderate — carpentry and load considerations | Low–Medium; ~30–40% savings vs adding upper cabinets | ⭐⭐ — high aesthetic change, lower concealed storage | Small kitchens, display-driven designs, lighten visual weight | Curate items; ensure shelves are weight-rated and well-installed |
| Budget Flooring Upgrades (LVP or Ceramic) | Moderate — LVP easier DIY; tile requires skill | Medium; LVP installed $2–8/sq ft; tile varies higher | ⭐⭐⭐ — durable, high-impact flooring upgrade (15–25+ years) | Moisture-prone kitchens; replace worn floors for big visual change | Level subfloor; acclimate materials; use quality underlayment |
| Strategic Lighting Upgrades | Low–Moderate — swap fixtures easy; rewiring needs electrician | Low–Medium; $300–1,500 depending on scope | ⭐⭐⭐ — major functional & ambiance improvement; energy savings | Improve task lighting, modernize look, increase safety | Layer ambient/task/accent lighting; choose 2700–3000K and dimmers |
| Fresh Paint and Drywall Refresh | Low — DIYable with prep; pros for pristine finish | Very Low–Medium; $200–800 DIY, $1,500–3,000 pro | ⭐⭐–⭐⭐⭐ — big visual lift; durability tied to prep & finish | Fast cosmetic overhaul; prep for resale; hide wear & stains | Use kitchen-grade semi-gloss/satin paint; repair drywall first |
| Decluttering & Organization Systems | Low — mostly DIY; simple installs | Very Low; $50–300 for comprehensive solutions | ⭐⭐ — high functional improvement; minimal visual remodeling | Improve usability without remodel; initial step for other projects | Measure before buying; label and assign homes for items |
| Appliance Refresh & Strategic Replacements | Moderate — selection, sizing; pro install for gas/electrics | Medium–High; $400–1,500 per appliance; $1,200–3,500 for two | ⭐⭐⭐ — strong visual & functional update if chosen well | Replace most visible appliances to modernize appearance | Prioritize visible units (fridge/range); check fit, energy ratings |
Bringing Your Affordable Kitchen Vision to Life
The journey to a revitalized kitchen doesn't have to be paved with overwhelming expenses. As we've explored, the secret to a successful and affordable kitchen remodel lies in strategic, high-impact updates that collectively transform the heart of your home. You now possess a comprehensive toolkit of ideas, from the transformative power of a fresh coat of paint on your cabinets to the modern appeal of a new peel-and-stick backsplash. The path forward is about making smart choices that align with your budget, lifestyle, and aesthetic goals.
The Power of Prioritization and Planning
The most critical takeaway from these affordable kitchen remodel ideas is the principle of prioritization. A complete gut renovation is often unnecessary. Instead, a targeted approach yields the most significant return on investment and personal satisfaction. Start by performing a frank assessment of your current space. What are the true pain points? Is it the dim, inadequate lighting? The dated, worn-out countertops? Or perhaps the chaotic clutter that no amount of tidying can seem to conquer?
Your answers will illuminate your path. By identifying the one or two elements that frustrate you the most, you can channel your resources where they will make the most tangible difference. For some, swapping out old, clunky hardware for sleek, modern pulls and knobs will instantly elevate the entire room. For others, installing durable and stylish luxury vinyl plank flooring will provide the foundational refresh the space desperately needs.
Key Insight: Your budget isn't a limitation; it's a guide. It forces creative thinking and encourages you to focus on changes that deliver maximum visual and functional impact, rather than chasing trends that may not suit your home's character or your family's needs.
Blending DIY Spirit with Professional Expertise
Many of the projects detailed in this guide, like installing open shelving or organizing your pantry, are well within the reach of a determined DIY enthusiast. Tackling these projects yourself is an excellent way to stretch your budget even further. However, it's equally important to recognize when to call in a professional. Projects that require specialized skills, such as complex electrical work for new lighting, precise tile installation, or achieving a flawless, durable finish on cabinet painting, are often best left to experienced tradespeople.
A poorly executed project can end up costing more in the long run to fix, not to mention the frustration it can cause. Investing in professional help for key tasks ensures the work is done correctly, safely, and efficiently. This hybrid approach allows you to save money where you can and invest wisely where it counts, guaranteeing a polished, high-quality result that you will enjoy for years to come. This strategic blend is the hallmark of a truly successful and affordable kitchen remodel.
Ultimately, creating a kitchen you love is an empowering process. It’s about more than just aesthetics; it's about designing a space that functions seamlessly for your daily life, a backdrop for making meals and memories. By combining strategic planning, creative material choices, and a smart mix of DIY effort and professional skill, you can bring your vision to life without breaking the bank. Your dream kitchen is not a distant fantasy; it’s an achievable goal, one smart decision at a time.
Ready to turn your plans into reality? For those key projects that require a skilled hand, from flawless drywall repair to expert fixture installation, the team at Garner Construction & Maintenance is ready to help. They specialize in executing high-quality updates with professionalism and reliability, ensuring your affordable kitchen remodel ideas are brought to life perfectly. Contact Garner Construction & Maintenance today to discuss your project and get a professional estimate.